Sustainable Products.Efficient Solutions
How to Properly Clean a Grease Trap
It’s essential to clean the grease trap regularly. If you don’t, there’s a chance that the grease will continue to build-up, representing a significant fire threat. Grease tends to ignite very easily. If it does catch, there is a chance that the fire could spread to the rest of the kitchen, causing thousands of dollars’ worth of damage. Grease can also pose an environmental danger. If the grease seeps out into the local ecosystem, it can damage the local ecosystem. To prevent these risks, you’ll need to make sure that you are keeping the grease trap clean. Let’s look at some of the steps you’ll need to follow to do this.
1. Remove the Grease Trap
First, you’ll want to pry the grease trap out, allowing you to remove the grease. As you’re doing this, you’ll need to go very slowly. There will be gaskets under the sink that connect the grease trap to the sink in most cases. If you damage these, they can be costly to replace, and it can also be difficult to reconnect the grease trap after you clean it.
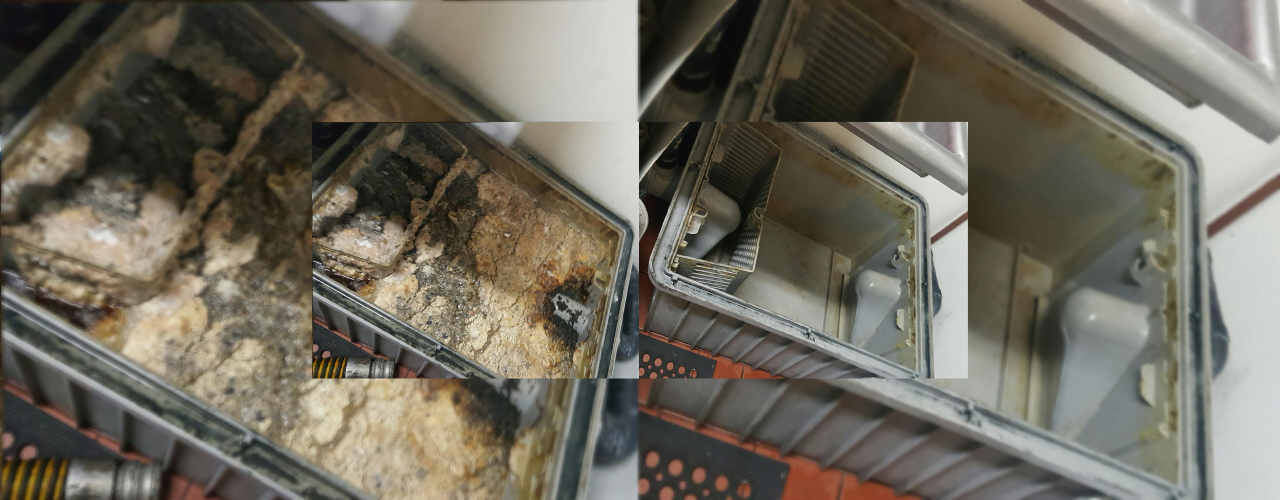
2. Photograph the Grease Trap
Once you’ve removed the grease trap, you’ll want to inspect it. Look at where all the elements are. It’s often a good idea to take a few pictures of the trap. By doing this, you can make sure that you can reassemble it correctly. It’s also a good idea to look at the instruction manual.
3. Measure the Amount of Grease in the Tank
The next thing that you’ll need to do is insert a wooden ruler. You might need to stir up the tank a little to get the ruler into the bottom, allowing you to see how much grease is in the tank. Once you know the amount of grease in the trap, you’ll need to record it in the FOG report. This information is an essential legal requirement because of the EPA. Once you’ve finished the grease report, you’ll need to complete the FOG report. You’ll need to mail it to the address listed on the account. If you choose a professional company, they can help you with these legal requirements, ensuring that you are compliant, avoiding a fine.
4. Remove Water and Grease
Once you’ve recorded the amount of grease, you can start cleaning the trap. In this case, you’ll first need to use a bucket to scoop out the standing water. You’ll often need to store this during the grease removal. When you have finished, you’ll be able to pour it back into the tank.
Once the water has been removed, you can begin removing the solidified grease. To do this, you might need to scrape down the sides of the tank. This grease can’t drain down the sink, as it will clog the pipes. This damage can be expensive to fix. Instead, you’ll need to put this into a sealable bag. When picking the bag, you need something that will be strong, making sure that it won’t leak.
5. Use Soap to Clean the Trap
Once you’ve removed as much grease as possible, you’ll need to perform a more thorough clean. To do this, you’ll need to use water and soap. You can use a soft cloth to clean the tank. For more built-up grease, you might need to use steel wool. This procedure will get rid of all the remaining grime. When you’re finished, you’ll need to remove the water, which will contain grease. So, it won’t be safe to pour it down the sink. If you have screens in the grease traps, you’ll need to remove them. Often, this means that you’ll need to unscrew them. Then, you’ll need to run how water through them, which should melt the grease.
6. Reassemble and Re-Install the Grease Trap
Finally, you’ll need to reassemble the trap. When doing this, you might want to refer to the images that you took earlier. This procedure will assure you that everything is going back into the correct place. Then, you’ll need to slot the grease trap back into place.
7. Safely Remove the Grease
After the grease trap has been put back into place, you’ll need to deal with the grease you removed. In this case, there are a few options that you might want to explore. For example, you might be able to turn it into a biofuel. While you can do this yourself, it’s a lot easier to call in a professional company. They might also pay a small rebate to help with the costs of running your business. In other cases, you might need to freeze the grease before putting it in a dumpster. Not all cities allow this, so you’ll need to check the rules in your local area, ensuring that you don’t receive a fine.
8. Monitor the Grease Trap
Once you’ve finished this process, you’ll need to monitor the grease trap, ensuring that you know when it’s time to clean it again. If the grease trap gets blocked up, you might notice that the water isn’t draining correctly. Another indication that it’s time to clean the trap is when you notice a foul smell from the trap. How often you’ll need to clean it will depend on the size of the trap. For smaller traps, you might need to clean it once every few weeks. For larger traps, you’ll need to clean them every few months.
Conclusion
Grease trap cleaning is an essential part of kitchen maintenance. As we’ve seen, it can often be an intensive process, requiring significant effort. While you can do it yourself, you might want to call in a professional cleaning company. This strategy assures you that everything has been done correctly. To learn more, contact the team at Grand Natural Inc and see how we can help you clean your grease trap.
categories
Recent Posts

Waste Cooking Oil Recycling Uses & Ideas
2022-04-18 07:00:00

Benefits of Purifying Used Cooking Oil
2022-04-13 07:00:00

5 benefits of recycling used cooking oil
2021-07-30 07:00:00

Things You Need to Know About Used Cooking Oil Collection
2021-07-30 07:00:00
Getting Set Up is Easy.Call UsSign Up NowORCall Us Today. (855) 519-5550